Snake and Spider Stew Ramen-Edition

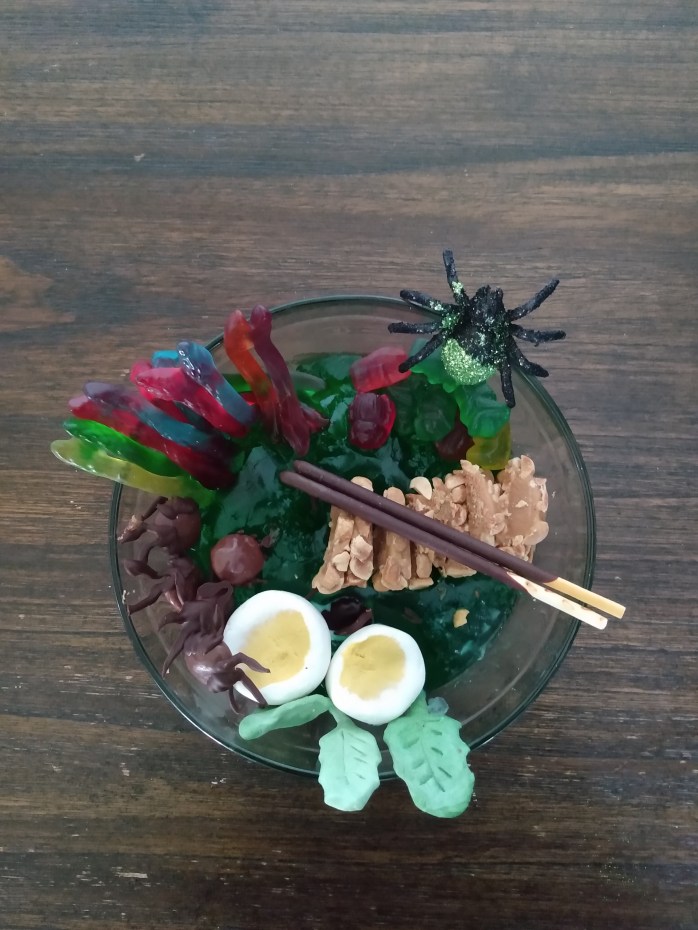
It’s time for another post chosen by the short stack, and as a nod at Halloween, they picked a stew, but ramen-ized, from The Nightmare Before Christmas. Snake and Spider Stew. Ewww. I’m not usually squeamish, and the snakes and spiders don’t bother me, but as you listen to the songs lyrics you realize that there’s a rat. In the pot. Just ewww. Soooo, in self defense, I decided to make this dish out of jello, and candy, and fondant. All things not disgusting. Now, generally, as a mother of four sons, I try not to interfere, and let them be as disgusting as they want to be….but this time?? It’s the rat, people. I just can’t. The closest I could get to it is a filleted Payday bar, which represents a filleted rat. *Gag* Ramen style filleted rat. It almost makes the spiders sound appealing, huh?

The creepier, the better.

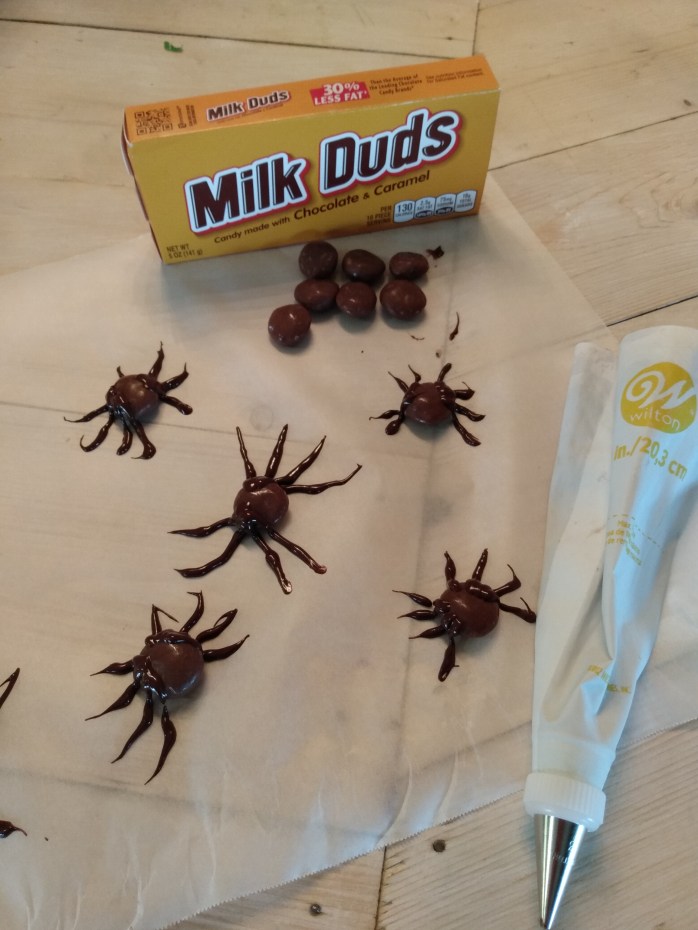
Speaking of spiders, making these Milkdud spiders is incredibly straightforward. You’re going to set the Milkduds on parchment, and pipe four legs on each side. It goes a bit easier if you set a cookie sheet in the freezer and put your parchment on that. It hardens faster and of course the cooler and thicker your chocolate the better the legs stay attatched. If you pipe them too thin this could cause you some trouble. If you’re the artistic type, go ahead and add the eyes. I’m not, so I didn’t. Get creative.

Ultimately, this recreation looks and tastes great, but can still make a stomach turn by just the thought. (Not to mention the sugar overload.) Still interested?

Then here’s what you’ll need:

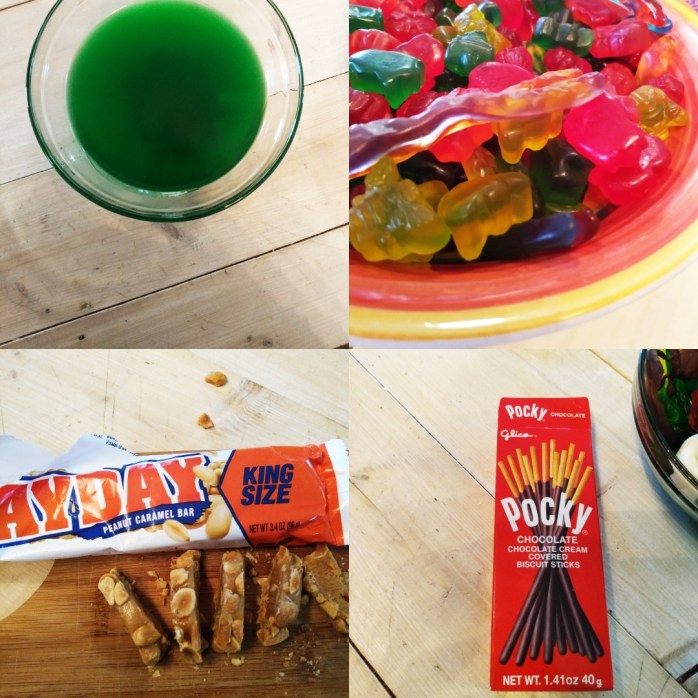
  • 1 pack of Green gelatin mix. (We chose ‘Jello’ brand in lime flavoring.)
  • An assortment of gummy candies in snake, spider-y and buggy shapes. (For snakes, we chose Haribo’s ‘Twin Snakes’ brand.
  • Milk Duds (spiders) + melted chocolate chips to add legs.
  • 1 Payday bar; for the above reason already discussed. ( I’d prefer to not have to say the R-word again.)
  • 1/2 cup of white fondant, yellow and green food color
  • Pocky biscuit sticks for yummy chopsticks.

Boil a cup of water, and pour the gelatin mix into a medium sized bowl, add boiling water to the gelatin, whisk briskly, allowing gelatin to dissolve into the water. Immediately afterward, add a cup of cold water to mix. Let it chill in the fridge or freezer for 2-4 hrs. While waiting, color a yolk sized piece of fondant yellow, wrap in white to form egg. I used the inside of an egg carton to help shape it. Color another small piece of fondant green, and form a couple of leaves to top your “stew” Once jello is completely set, you can stuff a few bugs into the center of jello, just remember to cover the holes with gummy bugs, and chocolate spiders. Add snake “noodles” to side of your bowl and don’t forget to let some “slither” out. Filet your “rat” and arrange it on top of bowl; ramen-style, next to your boiled egg and a few leaves. Style candies in the bowl as you see fit, add your Pocky chopsticks, (snap a great pic) and chow down!

Now that’s what I call Bugga-licious?

In conclusion, let’s try to forget about the rat. What do you think of this nightmarish concoction? Will you give it a try or does it give you the ‘Oogie-Boogies’? Leave a comment down below or shoot us a picture of it on Insta with #canigetaramen! Thanks for reading!

Honeycomb Cake

Welcome back to Geeky Grub! This month, we’re celebrating the release of Banjo and Kazooie as part of Challenger Pack 3 for Super Smash Bros. Ultimate!

The series of Smash Bros. has a long history of bringing some of the biggest icons in gaming together to duke it out and Banjo-Kazooie are no exception to this. Banjo and Kazooie are legends in their own right; they are some of only a few ‘Mario’ series characters that belong to a rival company and therefore makes them unique in that regard. Their series was originally a Nintendo-exclusive franchise and then went on to Xbox platforms from then on.

Banjo-Kazooie is a platforming game known best for the titular characters collecting three things: Jigsaw Pieces to access new game worlds, Musical Notes to open doors and Honeycombs for restoring health. We chose to make a Greek-style honey cake in the shape of a honeycomb and complete with honey pooled in the middle. Sound like Honey Bear heaven? Then here’s what you’ll need:

  • Honey, about half a cup
  • All-Purpose Flour, 3 cups
  • Eggs, 6
  • Granulated Sugar, 2 cups
  • Baking Powder, 2 teaspoons
  • Butter, 1 whole stick
  • Warm Milk, 1 cup
  • Baking Soda, half a teaspoon
  • Freshly-Squeezed Lemon Juice, 1 tablespoon
  • Confectioner’s Sugar, 1 cup
  • White chocolate candy melts, one bag or 12 ounces
  • Heavy whipping cream, 4 oz

Preheat your oven to 350′ degrees Fahrenheit. In a medium-sized bowl, cream the butter and sugar until light and fluffy. Add your flour to the butter cream and mix by hand until it is mealy and sticky. Add the eggs one at a time mixing between each addition. Combine baking soda and the lemon juice into your new mixture and mix thoroughly. Finally, add together your baking powder and milk in a separate bowl, adding it to the batter gradually until all mixed well. Place this in a square or rectangular pan. (Hexagonal if you can find it is ideal for this. We could not find one ourselves so we had to fold ours over, fill it with frosting and cut it to shape. We have a template for this right below.)

Be sure to cut along the black lines. Make a half-inch indentation where the slightly blurred line is, about an inch inward from the outer border.

(Because we used a long rectangular pan, we cut our cake in half and made it a layer cake. If you chose instead to use a square or hexagonal cake pan, you can skip this next paragraph.)

Next, we will make the filling that goes between layers. Combine 1 cup of confectioner’s sugar, 3 tbsp. of milk and 2 tbsp. of honey in a bowl and mix until it is stiff, but not set hard. Once your cake has finished baking, let it cool, then frost first layer, set second layer on top and secure in place with a few tall toothpicks .

From here, you’ll need to cut the cake into shape using the template above. Use a large, sharp knives this cake is pretty thick. We used the scraps from the cutting of the cake to create the borders so we could fill the cake basin with even more honey.

Finally, we’re going to create a white chocolate ganache to frost the top. Take your white candy melts and heat them for about 30-45 seconds in microwave, until just melty, but not completely melted. Combine this with your 4 oz. of heavy cream and let cool for about 20 minutes or until a firmer frosting like consistency has formed. Add some Wilton’s Buttercup Yellow and Wilton’s Copper Icing Color until it is a warm honey color, then begin to frost your cake, applying ganache in a thin layer, you can used a tiny bit of warm water to smooth ganache, but too much will ruin it so using it very sparingly. From here, let the cake set after being frosted for about 20 minutes. This is so the ganache will stiffen up a bit and not soak up the honey you will pour into the small basin in the middle of the cake.

“Mmm, I’m sticky, tasty honey energy!” -Honeycomb

This cake isn’t only good for celebrating a specific bear and bird’s introduction into the ultimate crossover game; it can be used for birthdays, gaming parties, or just an afternoon surprise for the kiddos . This Greek Honey Cake, plain makes for a great after-school snack as well, but if you follow this recipe exactly it has the added bonus of being themed after the most iconic bear and bird in gaming.

What do you think of the cake? Are you willing to give it a try? Are you or your kiddos excited for Banjo-Kazooie in Smash Ultimate? Most importantly, do you have any geeky food suggestions for us to give a whirl? Leave us your thoughts down below and be sure to drop your pictures down there too!